Update 12/24/2011: initramfs.img for Backfire 10.03.1 final is now available.
Update 11/16/2011: If you want to a larger root partition for your installation (The official one is about 50 MB), see Expanding x86 OpenWrt Root Partition
Update 11/15/2011: initramfs.img for Backfire 10.03.1-rc6 is available for download on SkyDrive.
Update 09/05/2011: If your OpenWRT PC’s BIOS does not support USB boot, see Booting From USB Without BIOS Support.
In this blog I will cover steps to create an x86 OpenWRT live USB on a Windows 7 PC. The steps are fairly simple. Just downloading files, move them around, and type a few commands. No Linux experience necessary. They can be easily adapted to Windows Vista or Windows XP if you have an older PC.
With a little more work, the technique discussed here can be adapted to create a bootable-x86-ISO/live-USB combination, for PCs that can’t boot from USB. That is something in my pipeline.
And of course Live USB can be created on a Linux system, but I don’t plan to write up the instructions. Leave a comment if you need help with that.
Finally, the theory of operation comes after the instructions. I think this live USB concept is a big improvement over my livecd idea (see Creating OpenWrt x86 Live CD with USB Support). I plan to keep up with newer OpenWRT releases.
Background
Occasionally I want to try different OpenWRT configurations while keeping the main installation intact. Although I can already do that with my custom live CDs , they are still cumbersome and slow when switching back and forth. An even better method is to boot from USB to a selection of firmware versions or configurations.
To create a bootable live USB using the steps discussed here, you’ll need
- An x86 PC that can boot from USB or CD. If you PC can boot from CD but not USB, see Booting From USB Without BIOS Support.
- A Windows PC for configuring the USB flash drive.
- A FAT or FAT32 USB flash drive. Each OpenWRT installation needs about 60 MiB of space. You do not need a large drive to start. Installation can be moved from one drive to another.
- Syslinux for creating bootable USB. Syslinux is free. Its website is http://www.syslinux.org. The download page is http://www.kernel.org/pub/linux/utils/boot/syslinux/.
Update 09/16/2011: kernel.org has been down for a while, taking syslinux with it. I searched for a Syslinux mirror and Google returned MuntInternet in the Netherlands.
OpenWRT Files
Three components make up one OpenWRT configuration: a Linux kernel, an initial rootfs image, and an OpenWRT disk image. All three are stored as files on the USB drive, and must have the same firmware version. For example, to boot your PC to OpenWRT Backfire 10.03, you need the 10.03 kernel, 10.03 OpenWRT disk image, and 10.03 initramfs image.
When changes are made to an OpenWRT router, they are stored in the disk image. The linux kernel and rootfs image are not changed. Therefore some configurations can use the same Linux kernel and rootfs image, as long as they are of the same version. Also, the disk images are initially compressed (.gz format). They are decompressed when used for the first time.
For clarity I gather files of the same version in one folder, and use the version number as folder names.
Official OpenWRT website has the kernels and disk images for many different platforms and versions. The rootfs images are modified disk images that I created, and are hosted on SkyDrive. Here are the links to all files.
Table updated on 12/24/2011
Creating A Three-Configuration Live USB
Here I will cover steps to create a live USB with three configurations:
- Config A: Version 10.03. It needs three files: 10.03 kernel, 10.03 rootfs image, and 10.03 disk image.
- Config B: Version 10.03.1-rc5. It also needs three files: 10.03.1-rc5 kernel, 10.03.1-rc5 rootfs image, and 10.03.1-rc5 disk image
- Config C: Also version 10.03.1-rc5. It needs just one file, its own 10.03.1-rc5 disk image. Config B and C will use the same kernel and rootfs image.
These 7 files are stored in two folders:
- 10.03: Files of Config A.
- openwrt-x86-vmlinuz: Backfire 10.03 Linux kernel
- openwrt-x86-ext2.image.gz: Backfire 10.03 disk image
- initramfs.img: Backfire 10.03 rootfs image
- 10.03.1-rc5: Files of Config B & C
- openwrt-x86-generic-vmlinuz: 10.03.1-rc5 Linux kernel
- config-b-openwrt-x86-generic-combined-ext2.img.gz: 10.03.1-rc5 disk image, for Config B.
- config-c-openwrt-x86-generic-combined-ext2.img.gz: 10.03.1-rc5 disk image, for Config C.
- initramfs.img: 10.03.1-rc5 rootfs image.
To create the folders and contents:
- Insert the USB drive. For this discussion, I’ll assume the drive letter is “E:”.
- Create two folders on “E:”: “10.03” and “10.03.1-rc5”.
- Follow the links given above, and download version 10.03 kernel, disk image, and rootfs image. Move these files to “E:\10.03”.
- Again, follow the links and download kernel, disk image, and rootfs image of version 10.03.1-rc5. Move these files to “E:\10.03.1-rc5”
- Navigate to “E:10.03.1-rc5”. Make a copy of the disk image. Name the new copy “config-c-openwrt-x86-generic-combined-ext2.img.gz”.
- Rename the original from “openwrt-x86-generic-combined-ext2.img.gz” to “config-b-openwrt-x86-generic-combined-ext2.img.gz”.
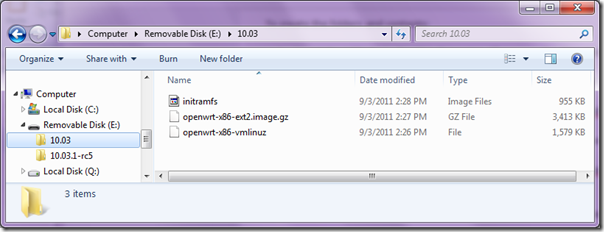
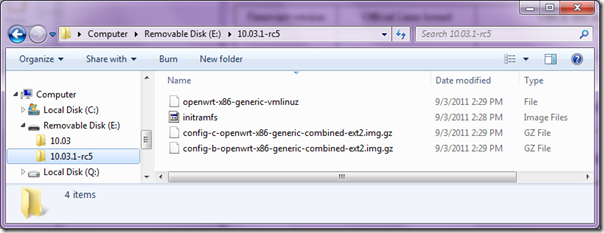
When you’re done, the USB drive and folders should look like these snapshots.


Making The USB Drive Bootable
We’ll use Syslinux as the bootloader.
- Download Syslinux. Follow the link given above and choose the ZIP archive because it is easier to work with on a Windows PC.
- Extract the content of the archive to a new folder. For this discussion, let’s assume that folder is “C:\syslinux-4.04”.
- Start a command prompt as administrator. Press the Windows Logo key and type “command prompt” in the search box. Right click on “Command Prompt” under “Programs”. Select “Run as administrator.” Answer “Yes” in the UAC pop-up window. An administrator command prompt should now be open.
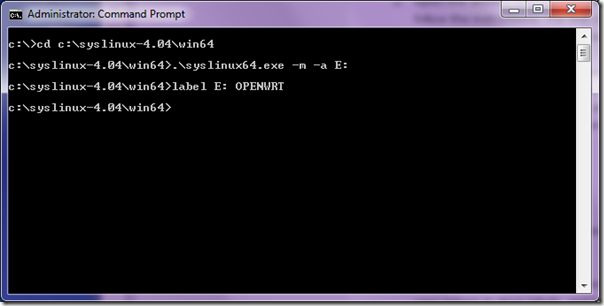
- Go to the executable directory and run Syslinux. Again, assuming the USB drive’s letter is “E:”, type
- 64-bit system
cd c:\syslinux-4.04\win64

.\syslinux64.exe -m -a E:
- 32-bit system
cd c:\syslinux-4.04\win32

.\syslinux.exe -m -a E:
“-m” places Syslinux on the master boot record of “E:” drive. “-a” marks the partition active.
- Label the flash drive. In the same command prompt, type
label E: OPENWRT
This disk label (“OPENWRT” here) will identify the USB drive to Linux kernel. You can choose a different label, but remember to use it in the Syslinux configuration file discussed later. Also, remember that Windows uses only uppercase letters in the label but Linux is case sensitive.

Configuring Syslinux
The final step is to create a configuration file for Syslinux. This file is named “syslinux.cfg” and stored at the root level of the USB drive. That is, “E:\syslinux.cfg”.
In “syslinux.cfg” list all OpenWRT configurations. There are four lines for each configuration:
- “label”: The label of a configuration. Entered at boot prompt to make a selection.
- “kernel”: The path to a kernel file on the USB drive. Use “/” instead “\” and discard the drive letter. For example, the kernel file of of Config A is
E:\10.03\openwrt-x86-vmlinuz
That makes the Syslinux entry
/10.03/openwrt-x86-vmlinuz
- “initrd”: Path to rootfs image. Again, no drive letter, and “/” instead of “\”
- “append”: Kernel command line options.
- “rootvol”: USB drive label. Add the prefix “LABEL=”, and remember to use all uppercase letters. For our USB drive, add the following text to the “append” line:
rootvol=LABEL=OPENWRT
“rootvol” is my addition to OpenWRT.
- “rootimage”: Path to disk image of a configuration. Discard drive letter and use “/”. For example, Config B uses the disk image
E:\10.03.1-rc5\config-b-openwrt-x86-generic-combined-ext2.img.gz
so add the following text to Config B’s “append” line
rootimage=/10.03.1-rc5/config-b-openwrt-x86-generic-combined-ext2.img.gz
“rootimage” is also my addition.
- “console”: Specify the linux console. If you have a video card and a monitor, use “console=tty0”. If your OpenWRT PC is headless, use “console=ttyS0,38400n8” to enable the serial port.
- “reboot”: original from OpenWRT
These entries can create a simple user interface for selecting a configuration.
- “say”: Display a message.
- “default”: The default choice
- “prompt”: 1 to turn on boot prompt.
- “timeout”: time to wait for user’s selection, in 1/10 of a second. (100 = 10 seconds)
- “ontimeout”: automatically selected choice on timeout.
The following configuration file will display the three choices discussed here. It will then wait 10 seconds for a user to enter “a”, “b”, or “c”. If a selection is made, Syslinux boots the chosen configuration. Otherwise, it boots Config A.
say a) Config A (10.03)

label a
kernel /10.03/openwrt-x86-vmlinuz
initrd /10.03/initramfs.img
append rootvol=LABEL=OPENWRT rootimage=/10.03/openwrt-x86-ext2.image.gz console=tty0 reboot=bios

say b) Config B (10.03.1-rc5)

label b
kernel /10.03.1-rc5/openwrt-x86-generic-vmlinuz
initrd /10.03.1-rc5/initramfs.img
append rootvol=LABEL=OPENWRT rootimage=/10.03.1-rc5/config-b-openwrt-x86-generic-combined-ext2.img.gz console=tty0 reboot=bios

say c) Config C (10.03.1-rc5)

label c
kernel /10.03.1-rc5/openwrt-x86-generic-vmlinuz
initrd /10.03.1-rc5/initramfs.img
append rootvol=LABEL=OPENWRT rootimage=/10.03.1-rc5/config-c-openwrt-x86-generic-combined-ext2.img.gz console=tty0 reboot=bios

say make a selection and press enter
default a
prompt 1
timeout 100
ontimeout a
Live USB Ready
That’s it. Just eject the drive from Windows and you have a Live USB drive with two OpenWRT configurations. When booting from this drive, you’ll see a list of 3 choices and have 10 seconds to choose.
Always Shutting Down Gracefully
I noticed that the FAT/FAT32 file systems are quite susceptible to data corruption. During development I lost many files by pressing the reset button on my PC. Always shut down your system gracefully to avoid data loss.
Why Booting from USB Fails
A desktop Linux system typically boots up in these steps:
- A bootloader, usually Grub, loads Linux kernel and initial rootfs image into memory and starts kernel execution.
- From initial rootfs Kernel starts an initialization program, usually “/init”, to set up essential system components, including root file system.
- If the necessary drivers are not built in the kernel, they are loaded from kernel modules.
- These modules are included in the initial rootfs because it is custom built for each system (by “dracut” or “mkinitrd” usually).
- Finally, the control is transferred to the “real” initialization program on the root file system.
The official x86 OpenWRT distribution differs from this flow. It skips the second step. The OpenWRT kernel itself initializes the root file system and transfer controls to it. This isn’t a problem when the root file system resides in an ext2 partition of a IDE or SATA hard disk. The ext2 and ATA drivers are already in the kernel. The USB drivers however are not, and this turns booting from USB into a Catch-22: The kernel can’t access the root file system without the USB modules, but the USB modules aren’t available because they are on the root file system.
Choosing an Alternative
One solution to this problem is to add the USB drivers and re-compile the kernel. It works but has two problems. It is opaque because changes in the kernel binary can’t be easily examined. It also requires the kernel on the official disk image to be replaced. That task is not simple for a novice.
Another solution is to use a combination of an initial rootfs image (initramfs.img) and Syslinux. This is a much better solution. The initial rootfs image can be easily examined. Setting up Syslinux is much simpler than replacing the kernel. Additionally, Syslinux works with FAT, which is the default file system on most USB drives, and it can be set up from a Windows PC, thus broadening the user base.
Setting Up USB Root
As mentioned earlier, a critical role of initramfs.img is to set up the root file system. In this case, the root file system is a image file on a USB drive. To set up the USB root, kernel runs “/init” of initramfs.img. “/init” is a shell script. It sets up the root file system in these steps:
- Load all modules in initramfs.img. They include drives for USB and FAT file system. (See “Creating initramfs.img” on adding these modules.)
- Using a parameter on kernel command line, identify the USB drive that holds the root file system. Mount that USB drive.
- Again using a kernel command line parameter, find the root file system image file. Decompress the file if necessary.
- Check the size of the image file. Pad it to ensure enough space is allocated for the root partition.
- Associate the image file with a loop device, run fsck, and mount it. Now the root file system is online.
- Add a step in OpenWRT’s pre-init flow to link “/dev/root” to the loop device.
- Unmount the USB drive.
- Call “switch_root” to start using the root file system.
#!/bin/sh
#
# Copyright (C) 2011 William H. Liao  All rights reserved.
#
# This copyrighted material is made available to anyone wishing to use,
# modify, copy, or redistribute it subject to the terms and conditions
# of the GNU General Public License.
#

# Kernel command line arguments:

# rootvol:
#	specify the volume that holds the ext2 root image file.
#	Valid options are
#		/dev/sdxy (e.g. /dev/sda1)
#		UUID=xxxx (as printed by 'blkid', but no quotes)
#		LABLE=yyyy ('yyyy' is case sensitive.  no quotes)
#
# rootimage:
#	File name of ext2 root image file.  Leading "/" optional

# chop off .gz from root image name

rootimage=${rootimage%.gz}

echo "Looking for $rootimage(.gz) on device $rootvol"

# root image file size, and start of root fs in image
# file.  Both are discovered using fsck on OpenWRT ext2
# image

rootimage_size=$((107856*512))
rootimage_offset=$((9135*512))

# Load modules to support USB and FAT

. /etc/functions.sh

load_modules /etc/modules.d/*

echo "Waiting 15 seconds for removable devices to stablize"
i=0
while [ $i -lt 15 ]; do
	sleep 1
	echo -n "."
	i=$(($i+1))
done
echo

# findfs is not built in OpenWRT busybox by default, so
# examine blkid output to find out the "rootvol" device.

mount proc /proc -t proc

root_dev=""
case "$rootvol" in
	/dev/*)
		root_dev=$rootvol
		;;
	UUID=*)
		# work in lower case because hexdecimal values
		# are case insensitive

		grep_string=`echo $rootvol | cut -d= -f2 | tr '[A-Z]' '[a-z]'`
		root_dev=`blkid | tr '[A-Z]' '[a-z]' | \
			fgrep uuid=\"$grep_string\" | cut -d: -f1`
		;;
	LABEL=*)
		grep_string=`echo $rootvol | cut -d= -f2`
		root_dev=`blkid | fgrep LABEL=\"$grep_string\" | cut -d: -f1`
		;;
esac

[ -z $root_dev ] && \
	{ echo "Root device not found" ; exit ; }
[ -b $root_dev ] || \
	{ echo "$root_dev not a block device" ; exit ; }

# Mount the "rootvol" and look for "rootimage"

mount $root_dev /mnt > /dev/null 2>&1 || \
	{ echo "Root volume not mounted" ; exit; }

if [ -r /mnt/$rootimage.gz ]; then
	[ -f /mnt/$rootimage ] && rm /mnt/$rootimage
	gunzip -f /mnt/$rootimage.gz || { echo "Can't decompress $rootimage.gz" ; exit ; }
fi

[ -r /mnt/$rootimage ] || { echo "No root image $rootimage on volume" ; umount /mnt ; exit; }

echo "root image found on $root_dev"

# Make sure the image file is at least as big as its partition
# table says.  If it isn't, enlarge it, to make sure enough space
# is allocated.

image_size=`ls -l /mnt/$rootimage | awk '{print $5}'`
if [ $image_size -lt $rootimage_size ]; then
	dd if=/dev/zero of=/mnt/$rootimage bs=1 seek=$image_size \
		count=$(($rootimage_size-$image_size)) ||
			{ echo "Can't pad root image" ; umount /mnt ; exit ; }
	echo "root image padded"
fi

# Now connect "rootimage" to /dev/root (same as /dev/loop0).  Use an
# offset to skip MBR, grub, boot partition, etc.

losetup /dev/loop0 /mnt/$rootimage -o $rootimage_offset ||
	{ echo "Can't set up root image loopback" ; umount /mnt ; exit ; }

# check the root image before mouting it

e2fsck -p /dev/root
case $? in
	0|1)
		: ;;
	2)
		reboot ;;
	*)
		echo "root FS image has errors"
		losetup -d /dev/loop0
		umount /mnt
		exit
		;;
esac

mount /dev/root /root ||
	{ echo "Can't mount root image" ; losetup -d /dev/loop0 ; umount /mnt ; exit ; }

# Add a script to create /dev/root

if [ ! -r /root/lib/preinit/21_add_root_dev ]; then
	cat << EOF > /root/lib/preinit/21_add_root_dev
#!/bin/sh

add_dev_root() {
	mknod /dev/loop0 b 7 0
	ln -s loop0 /dev/root
}

boot_hook_add preinit_essential add_dev_root
EOF
fi

# Finally, ready to switch root

echo "root image mounted, ready to switch"

umount -l /mnt	# lazy umount, since we're still using the usb drive
umount /proc

exec switch_root /root /etc/preinit

# Uh-oh, try cleaning up

umount /root
losetup -d /dev/loop0
Creating initramfs.img
“initramfs.img” is based on the official disk image, with the addition of USB and FAT modules and removal of others. I will describe just the general steps here because a detail discussion will be too long.
- Write the official x86 disk image to the storage of a kernel virtual machine.
- Start the KVM and configure its network interface so it can access the internet
- Use opkg to add and remove modules. The final list of module is
| base-files |
kmod-nls-base |
kmod-usb2 |
libuci |
| busybox |
kmod-nls-cp437 |
libblkid |
libuuid |
| e2fsprogs |
kmod-nls-iso8859-1 |
libc |
losetup |
| hotplug2 |
kmod-usb-core |
libext2fs |
opkg |
| kernel |
kmod-usb-ohci |
libgcc |
udevtrigger |
| kmod-fs-vfat |
kmod-usb-storage |
libpthread |
|
| kmod-loop |
kmod-usb-uhci |
librt |
|
- Turn off the KVM.
- Use “kpartx” to make the OpenWRT root partition available on the host system.
- Use “scripts/gen_initramfs_list.sh” from a kernel build directory to create a file list. This list includes basic device nodes, “/init” script shown above, and the root file system of the OpenWRT KVM.
- Edit the list to change absolute paths to relative. Also delete unnecessary files like “.svn” or “.git”.
- Use “usr/gen_init_cpio” from a kernel build directory to generate the initial rootfs. Compress it with gzip.
History
12/24/2011: Add note about 10.03.1 final.
11/16/2011: Add note about expanding root.
11/15/2011: Add note about 10.03.1-rc6. Strike kernel.org down.
09/16/2011: Note kernel.org is down. Give muntinternet syslinux mirror.
09/07/2011: Add “Why Booting From USB Fails”, “Choosing An Alternative”, “Setting Up USB Root”, and “Creating initramfs.img”
09/05/2011: Add note abut Plop Boot Manager. Change PC requirement.


